DV-PAL = the uk verious (digital video)
NTSC - american version - dont use this as it doesnt work over here for the cuts
The browser window is where we store the images etc - we import the images/video files will be imported to there (file - import)
the tab at the top says the name of what you saved your project as
you can view the contents of the browser window through a series of buttons
there is always one folder in there 'sequence 1' and is displayed along the timeline. The sequence is where you arrance the assets over time. (timeline). There is a ruler along the top which is divided into time. The sequence is arranced into orozontal tracks (v1, v2 (video 1) - this is where video and images can be arranged. Each piece of video has 2 pieces of audio tracks. (double number of audio tracks). There you make an arrangement of the assets in time. (hrs, min, secs, frames) (25 frames per seconds)
canvas video - shows what is happening at the moment in time - one frame at a time
you work in an anti-clockwise direction (left, bottom, right)
CHECK IF THE IMAGES ARE IN DV-PAL - otherwise it wont work
use the list view - frame size, make sure that it is 720 by 576 and 25 frames per second (fps)
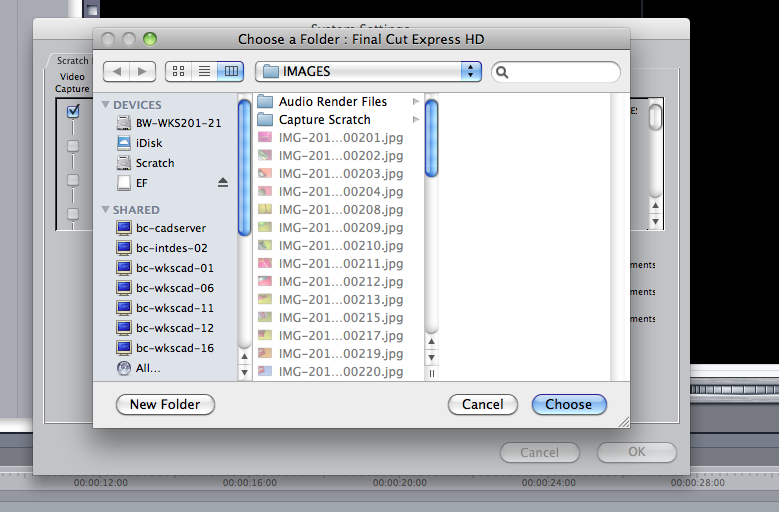
import your folder
all the files are called BINS and make sure they are all the correct size
to import the file into the timeline - click and drag. before you release the mouse button you can see the shadow of how the image is going to look/length
the snapping (magnetic attatchment) of 2 images when you move the arounds esures that there is no spacing between the images. you can leave some space if you want to (cant do this in quicktime) you can change the duration of the image by dragging one of the ends of the block
you have to drag each of the images down into the timeline individually (can be a very time consuming process) - there is another way, and you can change the pace of each of the images rather than going through the blocks and changing its duration individually. drag WHOLE folder - adds all images in the order which they are in by name. (if you havnt named them they will be named in characters/numerical order) press SHIFT then Z
CTRL A to select all images - then right cligh to get the contextual menu up to get the DURATION - can change the value
change to 6 frames per second then press SHIFT Z again

0
If it says UNRENDERED and you cant see the image it means that final cut means to edit some of the images - may be because computer istn powerful enough to play back or you have done some thing complex. it is HIGHLIGHTED BY RED LINE - go to SEQUENCE - RENDER ALL and it creates temporary file which it will use to play back the partt of the sequence
EXPORT VIDEO
make sure that your SEQUENCE is the ACTIVE WINDOW when you EXPORT IT
if you have sound make sure that the SOUND BOX IS CHECKED
to add text etc click 'file-new-sequence' then double click on this second sequence. you can have any number of sequences in any one project, e.g. sequence 1 - images, sequence 2 - one persecond. when you export it is the sequence which is being exported. (nesting sequences - combining the sequences by dragging one onto the other. because you have imbeded them you can now work with them as though it is one sequence - safely change the arrangements whcih out altering the different files.
ADDING TEXT
Using sequence 2 copy sequence on into it so that it is a whole block (easier to move). use the button shown below to click and add text. then drag the text shown on the black screen to the timeline above the pcitures. double click on this then you can edit the size, poisition, colour and typeface of the text and where abouts it will be placed in relevance to the photographs
ADDING AUDIO
AIFF FILES (mac standard audio files
MP3 from itunes
WAV
quicktime player is very good for converting files then export them
Ensure that the audio file is in the folder which we have been using on the USER WORK (make sure that final cut knows where all the origionals are - also helps when you moving the folder from userworks onto the desktop
then drag and drop the audio down into the timebar
SHIFT Z which will fit everything into the timeline. you have to be able to shorten the audio which will go with however long your image timeline is.
TO TRIM down - move the mouse point and drag the image to the left or to the right.
if you have a red line - make sure that you RENDER IT before you play it. make sure that you CLICK THE AUDIO BOX when you render it (sound)